I used PyTest for the first time recently. It’s similar to JUnit as one would expect (since they are both XUnit frameworks.) There were a few things that were unexpected though so writing a a blog post. That’ll help me remember if I forget 🙂 Plus posting something on the internet is a great way to find out what you misunderstood if anything!
Getting started
I redownloaded Python as it is been a couple years since I last used Python on my machine and I don’t remember the current state of affairs. Then I created a virtual env for this blog post.
python3 -m venv blog-post
cd blog-post
source bin/activate
Next I installed pytest and pytest-mock inside the virtual environment. (adding it to the requirements file isn’t enough. I think this since the IDE needs them to run the tests)
pip3 install pytest
pip3 install pytest-mock
I confirmed my VS Code had the Microsoft Python extension configured. It did. I also set up my project for Pytest integration as described in Eric’s blog post so I can run tests in my IDE.
Surprise #1: unittest vs pytest
Python has a built in testing framework called unittest and an add on one called pytest. Java has JUnit and TestNG so it certainly isn’t unusual to have more than one option. I was surprised one was built in though. And this difference was definitely one I had to pay attention to when looking at docs. More on the differences if curious.
Creating hello world test
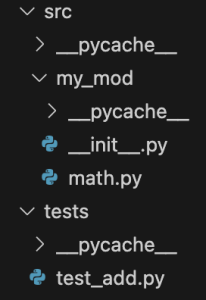
I created this directory structure:

math.py contains:
def add(x, y):
    return x + y
And test_add.py contains:
import pytest

import src.my_mod.math as target

def test_add():
    actual = target.add(4, 5)
    assert 9 == actual
I had to remember to use the flask icon to run in the IDE, but I’m not going to call that a surprise.
Surprise #2: Running at the command line
Running at the command line definitely yielded a surprise. This does not work because of the paths. (pytest uses a different path when the command vs a module
pytest
pytest tests
pytest tests/test_add.py
python -m pytest
Either of the following work. I like the first one because I don’t have to change the name of the file I want to run. (Although I’m using the IDE more anyway.)
python -m pytest tests
python -m pytest tests/test_add.py
Surprise #3: Assertion messages
The basics of assertions make sense to me. assert False, assert True, assert x == y. So far so good.
Failing assertions are good as well. Having an incorrect expected value gives output like the following. It shows the expanded version of actual. And it shows those final expected vs actual in the short test summary.
def test_add():
        actual = target.add(4, 5)
>       assert 7 == actual
E       assert 7 == 9

tests/test_add.py:7: AssertionError
=========================== short test summary info ============================
FAILED tests/test_add.py::test_add - assert 7 == 9
============================== 1 failed in 0.01s ===============================
Finished running tests!
In JUnit, it is good practice to add an assertion message to get more details. The expanded values are still there. However, the short test summary info only shows your custom message. I’m not using the message as I prefer to have the summary messages included what was expected vs actual and I don’t want to have to repeat the code to make that so.
    def test_add():
        actual = target.add(4, 5)
>       assert 7 == actual, "addition result incorrect"
E       AssertionError: addition result incorrect
E       assert 7 == 9

tests/test_add.py:7: AssertionError
=========================== short test summary info ============================
FAILED tests/test_add.py::test_add - AssertionError: addition result incorrect
============================== 1 failed in 0.02s ===============================
Finished running tests!
Surprise #4: Logging output
When not doing TDD (ex: testing code that already exists), I like to write a test that prints the expected value and then adding an assertion to match. I also do this when applying the golden master pattern (declare what exists to be working and codify it)
def test_add():
    actual = target.add(4, 5)
    print("Jeanne debug output " + str(actual))
I was baffled why there was no output. Reason? The print’s are only printed if the test contains a failing assertion!
On one of my machines, the prints don’t output in VS Code but do at the command line. On my other machine, it prints in both. It might be settings related, but not sure.
Surprise #5: Conventions matter
I accidentally created a file in tests that didn’t begin with test. I learned this is critical and my test got ignored until I renamed the file. (Yes, I’d have known this if I had read docs)
Surprise #6: When you made a syntax error…
If you make a certain syntax error, all the tests fail. This is scary until you realize what’s going on.
On to mocking
Here’s a simple test method to mock
import requests

def get_url(url):
    return requests.get(url)
And the test:
def test_get_url(mocker):
    url = 'https://python.org'
    data = 'html data from url'
    mocker.patch('requests.get', return_value=data)

    actual = target.get_url(url)
    assert data == actual
    requests.get.assert_called_once_with(url)
I like that the return_value is specified on the same line as the mock call. The assert for the parameter is at the end which differs from Java. I also like that there isn’t an elaborate dependency injection system. For more on mocking see Eric’s write up.
Surprise #7: My mock is a string???
When I wrote this line of code in error, I got an error that the ‘str’ object is not callable.
mocker.patch('requests.get', data)
In hindsight, this makes sense. I replace the “get” method with the string value data rather than setting data as a return value.
Surprise #8: operating system environment variables
I was mocking out os.env by setting a dictionary. I thought I was setting the environment variables to empty
mock.patch.dict(os.environ, {})
However, when I ran this on a CI server, it failed because the OS variable was in fact set. I learned that the dictionary is added to the existing variables by default. The fix is
mock.patch.dict(os.environ, {}, clear=True)
